
Setting up a VPN-only access for your Minecraft server using Pangolin
I always talk about the different ways to protect Minecraft servers from all kinds of danger. However, most of these arise from the fact that the servers are exposed to the public internet.
Most of the time having your server exposed to the public internet is the only practical solution. However, there is another solution for friend groups and small communities which completely eliminates the public factor: VPNs
VPNs (Virtual Private Networks) simply allow all connected users to connect to each other over secure tunnels instead. This removes the necessity of having your server available to the public - and with that a large amount of the perceived danger.
While it would be possible to set up such a VPN completely yourself, it does involve a bit of trial and error. It also might not be as easy to manage for you. This is where Pangolin comes into play. Pangolin is a software which allows you to easily manage a VPN network and the users therein. It provides an easy to understand web GUI for configuration and user management.
In this blog post I want to deviate a bit from my usual style and instead provide a comprehensive Step-by-Step and Input-by-Input tutorial on how you could set something like this up for your friend group. (A tutorial on how to do the same with raw Wireguard will follow at some point)
Prerequisites
- A domain you control
- A cheap VPS
- I can recommend Hetzner. Using my refferal link you get 20€ of credit for free to play around with.
- It is assumed that the VPS is freshly set up and has some kind of Debian/Ubuntu running on it.
Step 1: Preparing the server
Make sure the software running on the server is up to date:
apt update && apt upgrade -y
Also ensure that curl is installed:
apt install curl -y
Pangolin recommends installing it via Docker, so we will first have to set that up. Luckily Docker provides a handy install script which we can use:
curl -fsSL https://get.docker.com -o get-docker.sh && sh get-docker.sh
Now before we can set up Pangolin we have to prepare our DNS entries. Pangolin expects a wildcard entry to generate HTTPS certificates. For this tutorial I am going to use *.example.kittyscan.com but you can of course use whatever you want. Take note of your servers IP address and create the respective A and AAAA (if applicable) entries.

Step 2: Setting up Pangolin
The full documentation for this can be found here.
First we have to download the installer using this command:
curl -fsSL https://static.pangolin.net/get-installer.sh | bash
Then we can execute it by simply using:
./installer
You will see the following prompt:
Welcome to the Pangolin installer!
This installer will help you set up Pangolin on your server.

Please make sure you have the following prerequisites:
- Open TCP ports 80 and 443 and UDP ports 51820 and 21820 on your VPS and firewall.

Lets get started!

=== Basic Configuration ===
Do you want to install the Enterprise version of Pangolin? The EE is free for personal use or for businesses making less than 100k USD annually. (yes/no):
Select "no". The enterprise features are not necessary for this to work.
Enter your base domain (no subdomain e.g. example.com):
Respond with the domain you choose. In my case it is "example.kittyscan.com"
Enter the domain for the Pangolin dashboard (default: pangolin.example.kittyscan.com):
You can just keep the default here.
Enter email for Let's Encrypt certificates:
Enter your EMail there. This is required to generate the HTTPS certificates.
Do you want to use Gerbil to allow tunneled connections (yes/no) (default: yes):
Keep the default option (yes).
=== Email Configuration ===
Enable email functionality (SMTP) (yes/no) (default: no)
Also keep this on "no". You can set it up later if you want.
=== Advanced Configuration ===
Is your server IPv6 capable? (yes/no) (default: yes):
If your server has an IPv6 select "yes". If notn select "no". (Or get a better provider)
Do you want to download the MaxMind GeoLite2 database for geoblocking functionality? (yes/no) (default: yes):Also just keep this at "yes".
Nearly done:
=== Starting installation ===
Would you like to install and start the containers? (yes/no) (default: yes):
Select "yes".
Would you like to run Pangolin as Docker or Podman containers? (default: docker):
Keep the default "docker".
Now it will pull and start the containers. Depending on your internet connection this could take a few minutes.
After it is done it will ask you if you would like to install CrowdSec. Just answer "no".
This will finalize the setup and tell you the next steps:
=== Setup Token ===
Waiting for Pangolin to generate setup token...
Setup token: 9z3rcy8hlujefrvw5w7y7068gbjfj09g

This token is required to register the first admin account in the web UI at:
https://pangolin.example.kittyscan.com/auth/initial-setup

Save this token securely. It will be invalid after the first admin is created.

Installation complete!

To complete the initial setup, please visit:
https://pangolin.example.kittyscan.com/auth/initial-setup
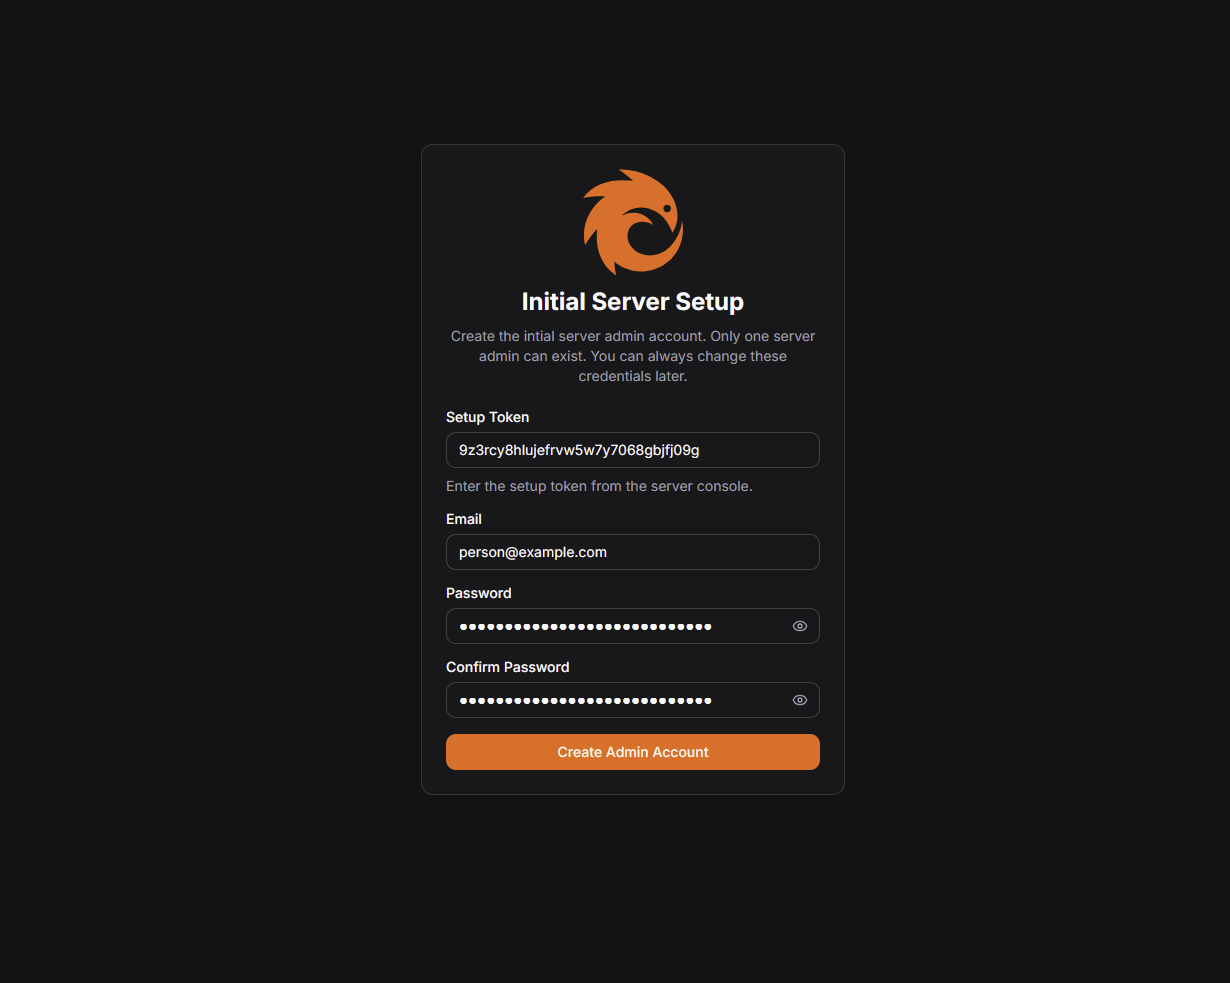
Visit the link it shows you. In my case it is "https://pangolin.example.kittyscan.com/auth/initial-setup". There you will see a page like the one below. Just enter your credentials and the token given by the installer. Once you have done that, just click the orange "Create Admin Account" button.
You will be redirected to the login page. Enter your credentials and log in.
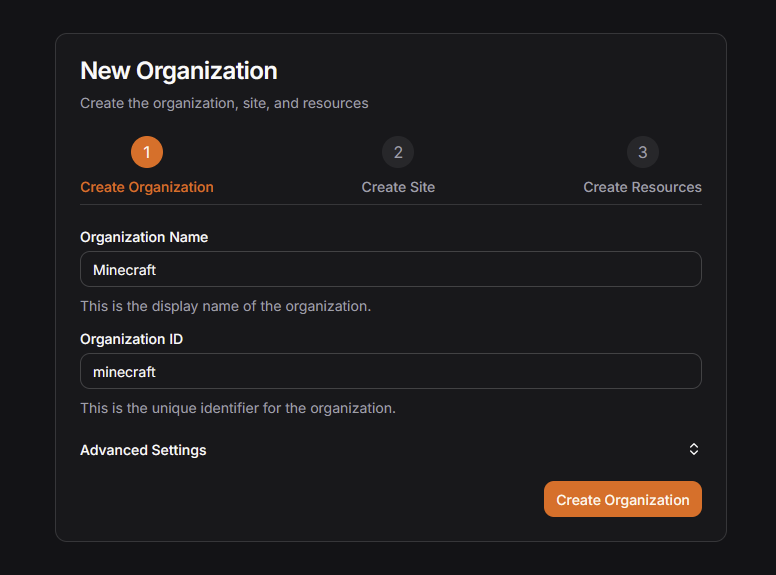
Now you will be asked to create an organization. Just give it a fitting name such as "Minecraft". Click "Create Organization" afterwards.
And with that the setup is done.
Step 3: Connecting our Minecraft server
Now that Pangolin is set up, we have to make our Minecraft server reachable through the VPN. For that click on "Sites" in the sidebar and then "Add Site". This site will represent our Minecraft server.
Keep "Newt Site" selected and enter a name for this connection.
On the bottom is a "Install Newt" section where you can find the commands for many use cases. In this case I will set up the Server via Docker Compose so I just copy the pregenerated config and click "Create Site".

A fully Docker contained setup using the itzg/docker-minecraft-server images now looks something like this:
services:
  mc:
    image: itzg/minecraft-server:latest
    environment:
      EULA: "TRUE"
  newt:
    image: fosrl/newt
    container_name: newt
    restart: unless-stopped
    environment:
      - PANGOLIN_ENDPOINT=https://pangolin.example.kittyscan.com
      - NEWT_ID=8mm9z4eruiihh5d
      - NEWT_SECRET=wk8p8lmrg1ay3mk6osbmiwqnfm1ciqew2z3p693wvi2gq2iw
Notice that we do not use any "ports" declaration. The "newt" container will connect to the VPN and provide access to the Minecraft server. No public availability needed.
Run docker compose up -d and after a few seconds you should see that the status has changed to "online".

Now navigate to "Resources > Private" and click "Add Resource". Here we configure who can access the server once they are within the VPN.
Enter a name for this resource. Make sure that the selected Site is the one you just created.
Under "Destination", keep "Host" selected and enter the name of the Minecraft container or some other way to reach it from your Site (localhost, ...). In our example it is "mc". Under "alias" you can enter a vanity DNS name that users can use to connect once they are logged in. Keep the port restrictions empty. Do not click "Create Resource" yet.
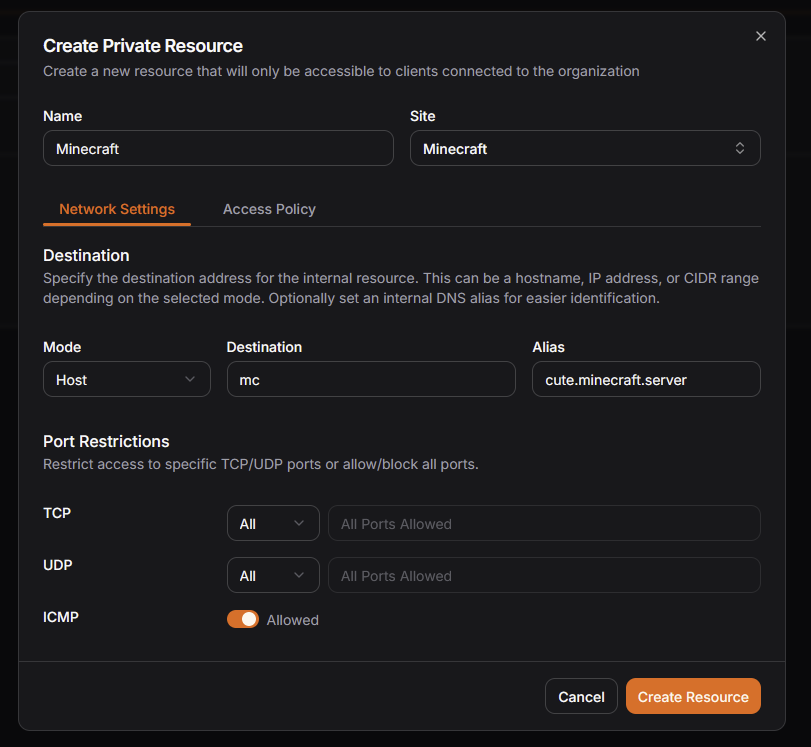
Switch to the "Access Policy" tab and under "Roles" select "Member". This will ensure that all users within the VPN can connect. You can also authorize selectively by selecting the accounts under "Users". Now you can click "Create Resource"
Step 4: Connecting our users
Now that our server is connected the only thing that is missing is ... us. To change that visit https://pangolin.net/downloads/ and download and install the client for your Operating system.
I am using Windows, but the steps should be roughly the same for all platforms.
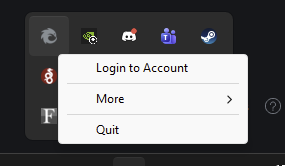
Once you have installed the client it will be in your hotbar. Right click the icon and select "Login to Account"
This will open a window. Select "Self-hosted or dedicated instance". Enter the URL of your server, in our case "https://pangolin.example.kittyscan.com". Upon clicking "Login" a browser window will open prompting you to log in. Do that.
It will ask you if you want to authorize this device to log in. Select the "Authorize" Option. Once you see the "Device Connected!" screen you can close the browser window.
Now that you are logged in, right click the icon again and select "Connect".
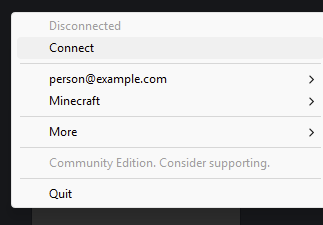
Once the icon has turned orange you are successfully connected.
The only thing that remains now is to open Minecraft and connect via the name we defined at the end of step 3.
It works!
To add your friends just create invite links in "Users > Users > Create User". Once they have created their account they can install the client the same way you have and start playing.
If you want to learn more or have any questions, feel free to join the KittyScan Discord server.